In addition to this project, one of our partners was needing a mobile application that was going to use the same database as the web app. To facilitate communication between the backend and all of their applications, we needed a robust solution for sending notifications with concealed information to the mobile app.
After a thorough proof of concept, we decided to harness the capabilities of Firebase to bridge the gap between our backend and various applications.
What is Firebase?
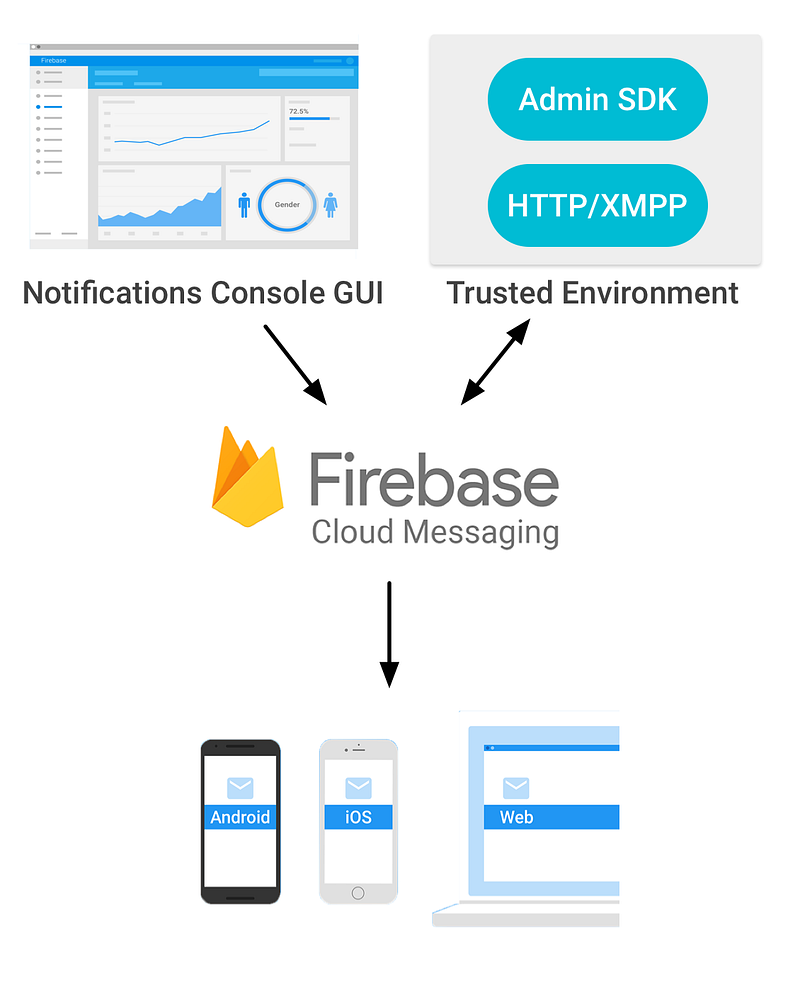
Firebase serves as a Backend as a Service (BaaS) that simplifies the creation of a backend with minimal coding expertise. It offers seamless integration with various platforms, including iOS, Android, Unity, and C++.
Firebase’s extensive range of services spans authentication, storage, real-time database, crash reports, and Firebase Cloud Messaging (FCM), which is instrumental for push notifications.
Advantages of Firebase Cloud Messaging (FCM)
FCM gives us many advantages, here is the list of the most important:
Cost-Effective: FCM offers unlimited use for free, making it a budget-friendly choice.
Multi-Platform Integration: It seamlessly integrates with multiple platforms, simplifying the development process.
Well-Documented: Firebase provides comprehensive documentation, making it user-friendly.
Swift Delivery: FCM ensures that 95% of all notifications experience a minimal delay of just 250ms from the time of dispatch to reception on the recipient’s platform (courtesy of Google).
Audience Targeting: You can tailor messages to specific devices, platforms, or user groups.
Versatile Messaging: Messages can be dispatched via the Firebase Console or the Firebase API.
Here’s the FCM flow:
Setting up the Client-Side
Now that the Firebase introduction is finished, it’s coding and configuring time.
To begin, create a Firebase Console project using your Google account. Once in the Firebase dashboard, select ‘Add project’. Specify your project’s name and region, and then click on ‘Create project’.
Ok, you’re done! You have your project created, so now you are able to use all Firebase functionalities!
You must register each platform you intend to configure Firebase for. In this tutorial, we’ll focus on configuring an Android project.
During app registration, you’ll need to fill in the package name according to your app’s specifications. Firebase’s initial project already contains the package name, typically set as ‘com.google.firebase.quickstart.fcm’. You can find these projects in the documentation samples section.
Following app registration, you’ll need to download and add the ‘google-services.json’ file to your project. If you haven’t already received it from Firebase, they will provide it.
Additionally, don’t forget to add FCM dependencies, as they are essential for Firebase to function seamlessly within your app.
Well done, your client side is ready, if you want more information about client side configuration you can get it on the documentation guide for Android or for iOS or other platforms you will find on the side panel of the Cloud Messaging documentation page.
Obtaining Device Tokens
For each app-installation, Firebase is going to create a token that identifies it, so in case of sending a notification to that specific app-installation, you will need that token.
To learn about getting this token, please read ‘Access the device registration token’ part on the setting up section of the platform you want to configure Firebase to.
Well done, your client side is ready, if you want more information about client side configuration you can get it on the documentation guide for Android or for iOS or other platforms you will find on the side panel of the Cloud Messaging documentation page.
Sending Our First Notification
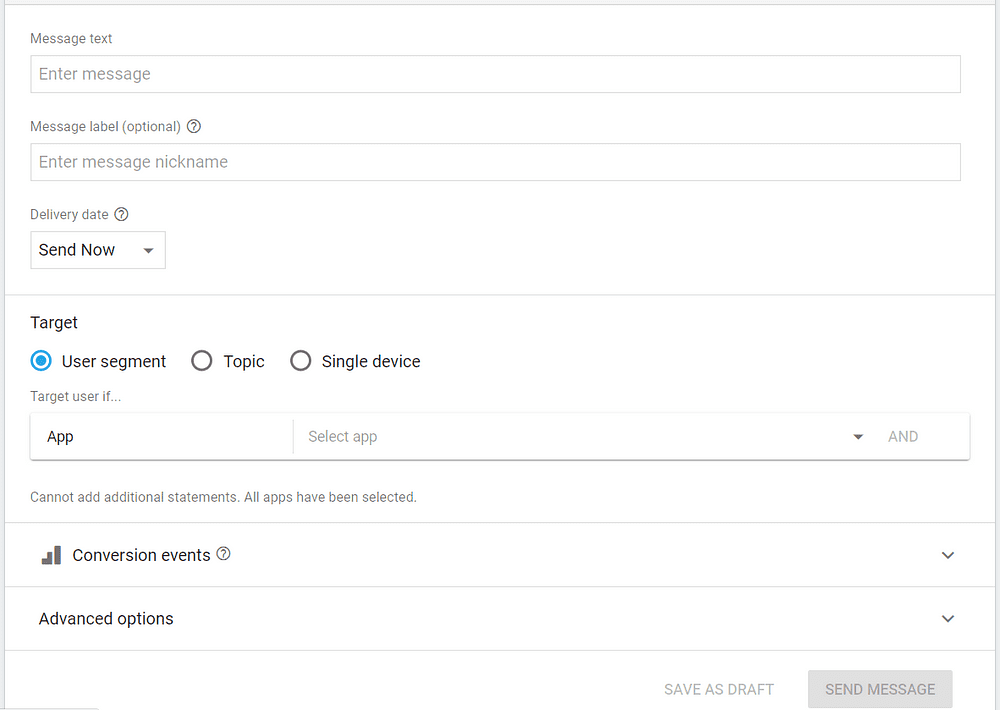
We can send push notifications without a fully configured backend, using the Firebase console.
To do this, navigate to your Firebase project, select ‘Notifications’ in the side panel, and click ‘Send your first message’. This will take you to this configuration panel:
Here you’ll need to provide the following details:
Message text: The main content of your notification.
Target: Define the devices you want to reach, selecting from options like “User segment,” “Topic,” or “Single device.” Each target allows you to tailor your message effectively.
Once you’ve filled in these fields, click ‘SEND MESSAGE’.
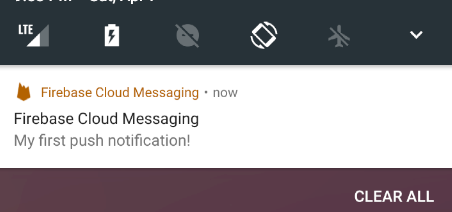
A pop-up will display, summarizing the key details of your notification. Click ‘SEND’, and your push notification is on its way!
Configuring Your .NET Backend
For this example, we’ll use a .NET backend – a console project designed specifically for a .NET Meetup in Uruguay.
To access the Firebase API, you’ll need critical information from Firebase, including the API URL (https://fcm.googleapis.com/fcm/send) and a unique server key that authenticates your Firebase project for security purposes.
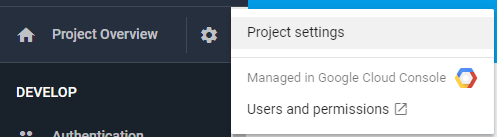
To obtain the server key:
Access ‘Project settings’ as depicted in the image.
Select the ‘Cloud Messaging’ tab.
Find the server key in the ‘Project credentials’ section.
Time to Code the Backend
In addition to the API URL and server key, you’ll require a method with specific parameters to communicate with the Firebase API. For this purpose, create a static class named “PushNotificationLogic.cs” containing the following method:
These parameters are:
deviceTokens: An array of strings, each string represents a FCM token provided by Firebase on each app-installation. This is going to be the list of app-installations that the notification is going to send.
title: It’s the bold section of a notification.
body: It represents ‘Message text’ field of the Firebase SDK, this is the message you want to send to the users.
data: These is a dynamic object, it can be whatever you want because this object is going to be used as additional information you want to send to the app, it’s like hidden information. For example an action you want to execute when the user presses on the notification or an id of some product.
For the method, I am going to suppose that all parameters are correct without bad values (you can add all the validations you want). The first thing we have to do is to create an object with all the data we need to send to the API, I created two classes for that:
public class Message
{
  public string[] registration_ids { get; set; }
  public Notification notification { get; set; }
  public object data { get; set; }
}
public class Notification
{
  public string title { get; set; }
  public string text { get; set; }
}
Then, just create a new object of type ‘Message’ and serialize it as I did it here:
var messageInformation = new Message()
{
  notification = new Notification()
  {
    title = title,
    text = body
  },
  data = data,
  registration_ids = deviceTokens
};
//Object to JSON STRUCTURE => using Newtonsoft.Json;
string jsonMessage = JsonConvert.SerializeObject(messageInformation);
Now we just need a request to Firebase API and we’re done.
The request has to be as a “Post” Method to the Firebase API-Url, we have to add a Header which is “Authorization” and use a value like: “key={YourServerKey}”.
Then we add the content (jsonMessage) and you are ready to hit the api.
Here it is the code you need to do the last part:
// Create request to Firebase API
var request = new HttpRequestMessage(HttpMethod.Post, FireBasePushNotificationsURL);
request.Headers.TryAddWithoutValidation(“Authorization”, “key=” + ServerKey);
request.Content = new StringContent(jsonMessage, Encoding.UTF8, “application/json”);
HttpResponseMessage result;
using (var client = new HttpClient())
{
  result = await client.SendAsync(request);
}