




Kaizen Teams

Dropdown

Table of Contents

Time to read

·

12

Published on

·

April 11, 2018

Last updated on

·

April 10, 2026

Eduardo Mereles, Full-Stack Developer at Kaizen Softworks

Eduardo Mereles

Responsibility police

Full-Stack Developer

Technology

Technology

How to Setup Firebase Push Notifications with a .NET Backend

Published on

·

April 10, 2026

Last updated on

·

April 10, 2026

Time to read

·

12

Eduardo Mereles, Full-Stack Developer at Kaizen Softworks

Eduardo Mereles

Full-Stack Developer

At Kaizen Softworks, we are currently working on a site that uses Angular 2, .NET and Azure as main technologies.

In addition to this project, one of our partners was needing a mobile application that was going to use the same database as the web app. To facilitate communication between the backend and all of their applications, we needed a robust solution for sending notifications with concealed information to the mobile app.

After a thorough proof of concept, we decided to harness the capabilities of Firebase to bridge the gap between our backend and various applications.

What is Firebase?

Firebase serves as a Backend as a Service (BaaS) that simplifies the creation of a backend with minimal coding expertise. It offers seamless integration with various platforms, including iOS, Android, Unity, and C++.

Firebase's extensive range of services spans authentication, storage, real-time database, crash reports, and Firebase Cloud Messaging (FCM), which is instrumental for push notifications.

Advantages of Firebase Cloud Messaging (FCM)

FCM gives us many advantages, here is the list of the most important:

  1. Cost-Effective: FCM offers unlimited use for free, making it a budget-friendly choice.
  2. Multi-Platform Integration: It seamlessly integrates with multiple platforms, simplifying the development process.
  3. Well-Documented: Firebase provides comprehensive documentation, making it user-friendly.
  4. Swift Delivery: FCM ensures that 95% of all notifications experience a minimal delay of just 250ms from the time of dispatch to reception on the recipient's platform (courtesy of Google).
  5. Audience Targeting: You can tailor messages to specific devices, platforms, or user groups.
  6. Versatile Messaging: Messages can be dispatched via the Firebase Console or the Firebase API.

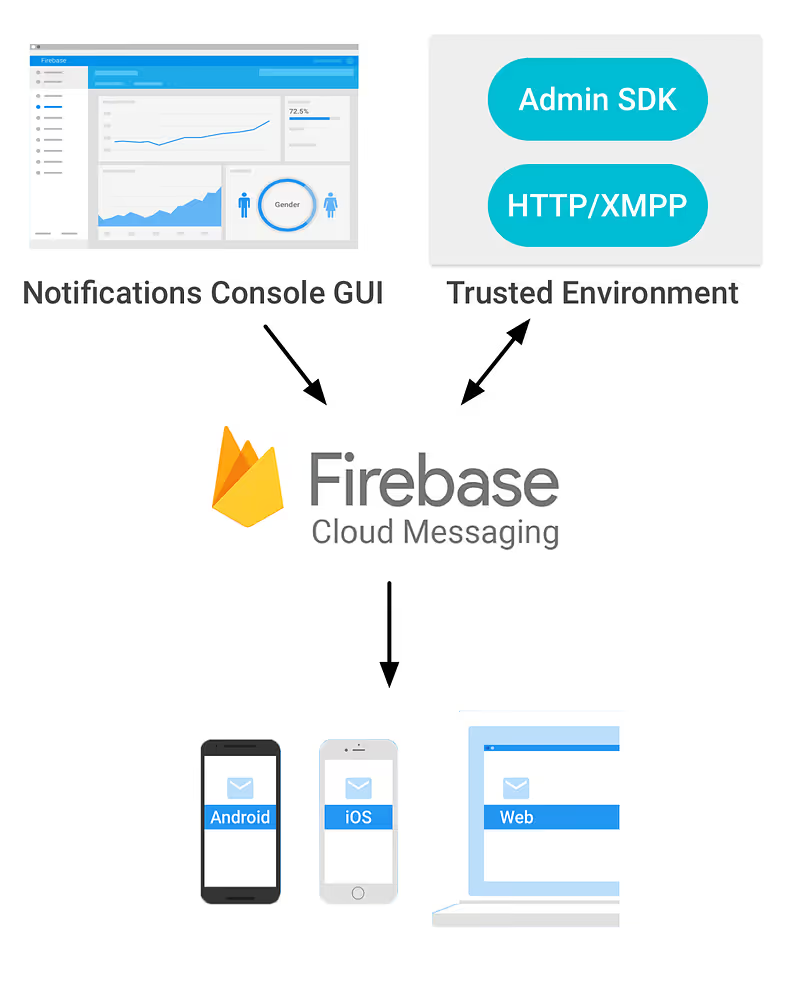
Here's the FCM flow:

Graphic of Firebase Cloud Messaging Flow

Setting up the Client-Side

Now that the Firebase introduction is finished, it’s coding and configuring time.

To begin, create a Firebase Console project using your Google account. Once in the Firebase dashboard, select 'Add project'. Specify your project's name and region, and then click on 'Create project'.

Ok, you’re done! You have your project created, so now you are able to use all Firebase functionalities!

You must register each platform you intend to configure Firebase for. In this tutorial, we'll focus on configuring an Android project.

During app registration, you'll need to fill in the package name according to your app's specifications. Firebase's initial project already contains the package name, typically set as 'com.google.firebase.quickstart.fcm'. You can find these projects in the documentation samples section.

Following app registration, you'll need to download and add the 'google-services.json' file to your project. If you haven't already received it from Firebase, they will provide it.

Additionally, don't forget to add FCM dependencies, as they are essential for Firebase to function seamlessly within your app.

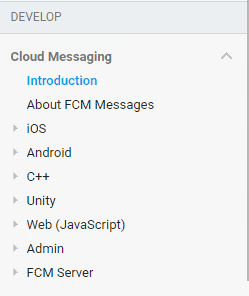
Screenshot of Firebase Cloud Messaging Menu

Well done, your client side is ready, if you want more information about client side configuration you can get it on the documentation guide for Android or for iOS or other platforms you will find on the side panel of the Cloud Messaging documentation page.

Obtaining Device Tokens

For each app-installation, Firebase is going to create a token that identifies it, so in case of sending a notification to that specific app-installation, you will need that token.

To learn about getting this token, please read 'Access the device registration token' part on the setting up section of the platform you want to configure Firebase to.

Well done, your client side is ready, if you want more information about client side configuration you can get it on the documentation guide for Android or for iOS or other platforms you will find on the side panel of the Cloud Messaging documentation page.

Sending Our First Notification

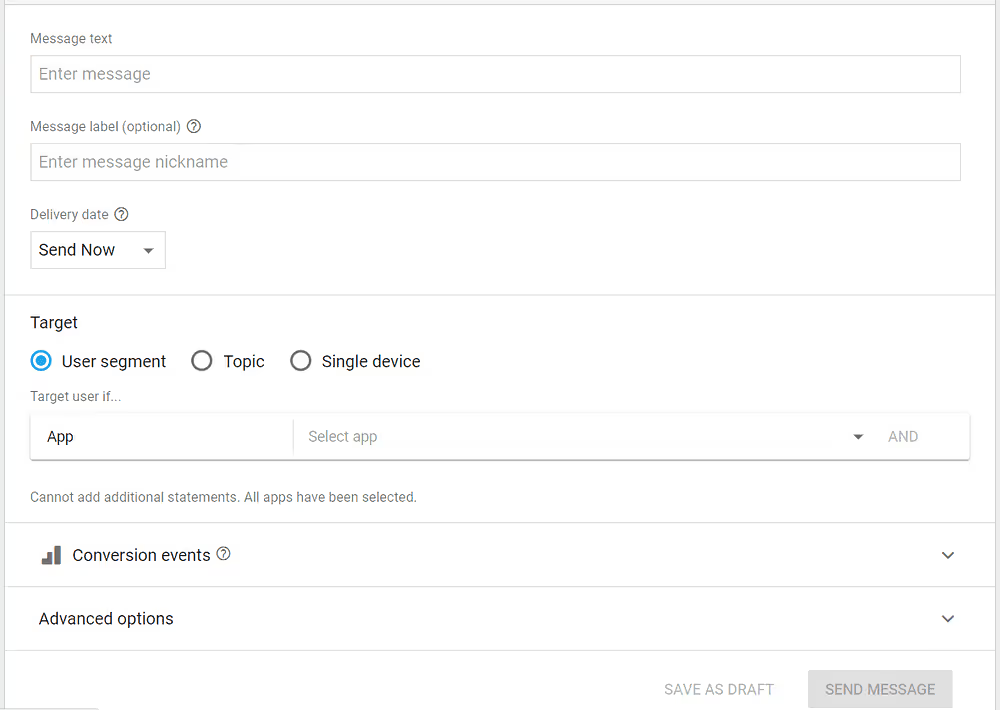
We can send push notifications without a fully configured backend, using the Firebase console.

To do this, navigate to your Firebase project, select 'Notifications' in the side panel, and click 'Send your first message'. This will take you to this configuration panel:

Screenshot of Firebase Cloud Messaging

Here you'll need to provide the following details:

  • Message text: The main content of your notification.
  • Target: Define the devices you want to reach, selecting from options like "User segment," "Topic," or "Single device." Each target allows you to tailor your message effectively.

Once you've filled in these fields, click 'SEND MESSAGE'.

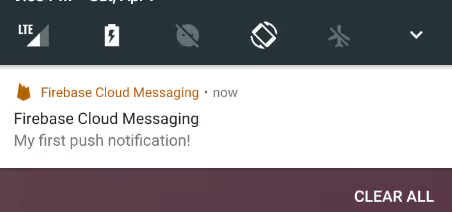
A pop-up will display, summarizing the key details of your notification. Click 'SEND', and your push notification is on its way!

Screenshot of Firebase-Cloud Messaging Notification

Configuring Your .NET Backend

For this example, we'll use a .NET backend – a console project designed specifically for a .NET Meetup in Uruguay.

To access the Firebase API, you'll need critical information from Firebase, including the API URL (https://fcm.googleapis.com/fcm/send) and a unique server key that authenticates your Firebase project for security purposes.

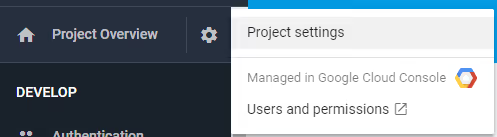
To obtain the server key:

  1. Access 'Project settings' as depicted in the image.
  2. Select the 'Cloud Messaging' tab.
  3. Find the server key in the 'Project credentials' section.
Screenshot of Firebase Cloud Messaging Project Settings

Time to Code the Backend

In addition to the API URL and server key, you'll require a method with specific parameters to communicate with the Firebase API. For this purpose, create a static class named "PushNotificationLogic.cs" containing the following method:

Push Notifications Logic Code Method

These parameters are:

  • deviceTokens: An array of strings, each string represents a FCM token provided by Firebase on each app-installation. This is going to be the list of app-installations that the notification is going to send.
  • title: It’s the bold section of a notification.
  • body: It represents 'Message text' field of the Firebase SDK, this is the message you want to send to the users.
  • data: These is a dynamic object, it can be whatever you want because this object is going to be used as additional information you want to send to the app, it’s like hidden information. For example an action you want to execute when the user presses on the notification or an id of some product.

For the method, I am going to suppose that all parameters are correct without bad values (you can add all the validations you want). The first thing we have to do is to create an object with all the data we need to send to the API, I created two classes for that:

public class Message
{
public string[] registration_ids { get; set; }
public Notification notification { get; set; }
public object data { get; set; }
}
public class Notification
{
public string title { get; set; }
public string text { get; set; }
}

Then, just create a new object of type 'Message' and serialize it as I did it here:

var messageInformation = new Message()
{
notification = new Notification()
{
title = title,
text = body
},
data = data,
registration_ids = deviceTokens
};
//Object to JSON STRUCTURE => using Newtonsoft.Json;
string jsonMessage = JsonConvert.SerializeObject(messageInformation);

Now we just need a request to Firebase API and we’re done.

The request has to be as a "Post" Method to the Firebase API-Url, we have to add a Header which is "Authorization" and use a value like: “key={YourServerKey}”.

Then we add the content (jsonMessage) and you are ready to hit the api.

Here it is the code you need to do the last part:

// Create request to Firebase API
var request = new HttpRequestMessage(HttpMethod.Post, FireBasePushNotificationsURL);
request.Headers.TryAddWithoutValidation(“Authorization”, “key=” + ServerKey);
request.Content = new StringContent(jsonMessage, Encoding.UTF8, “application/json”);
HttpResponseMessage result;
using (var client = new HttpClient())
{
result = await client.SendAsync(request);
}

Thank You For Reading!

At Kaizen Softworks, we are currently working on a site that uses Angular 2, .NET and Azure as main technologies.

In addition to this project, one of our partners was needing a mobile application that was going to use the same database as the web app. To facilitate communication between the backend and all of their applications, we needed a robust solution for sending notifications with concealed information to the mobile app.

After a thorough proof of concept, we decided to harness the capabilities of Firebase to bridge the gap between our backend and various applications.

What is Firebase?

Firebase serves as a Backend as a Service (BaaS) that simplifies the creation of a backend with minimal coding expertise. It offers seamless integration with various platforms, including iOS, Android, Unity, and C++.

Firebase's extensive range of services spans authentication, storage, real-time database, crash reports, and Firebase Cloud Messaging (FCM), which is instrumental for push notifications.

Advantages of Firebase Cloud Messaging (FCM)

FCM gives us many advantages, here is the list of the most important:

  1. Cost-Effective: FCM offers unlimited use for free, making it a budget-friendly choice.
  2. Multi-Platform Integration: It seamlessly integrates with multiple platforms, simplifying the development process.
  3. Well-Documented: Firebase provides comprehensive documentation, making it user-friendly.
  4. Swift Delivery: FCM ensures that 95% of all notifications experience a minimal delay of just 250ms from the time of dispatch to reception on the recipient's platform (courtesy of Google).
  5. Audience Targeting: You can tailor messages to specific devices, platforms, or user groups.
  6. Versatile Messaging: Messages can be dispatched via the Firebase Console or the Firebase API.

Here's the FCM flow:

Graphic of Firebase Cloud Messaging Flow

Setting up the Client-Side

Now that the Firebase introduction is finished, it’s coding and configuring time.

To begin, create a Firebase Console project using your Google account. Once in the Firebase dashboard, select 'Add project'. Specify your project's name and region, and then click on 'Create project'.

Ok, you’re done! You have your project created, so now you are able to use all Firebase functionalities!

You must register each platform you intend to configure Firebase for. In this tutorial, we'll focus on configuring an Android project.

During app registration, you'll need to fill in the package name according to your app's specifications. Firebase's initial project already contains the package name, typically set as 'com.google.firebase.quickstart.fcm'. You can find these projects in the documentation samples section.

Following app registration, you'll need to download and add the 'google-services.json' file to your project. If you haven't already received it from Firebase, they will provide it.

Additionally, don't forget to add FCM dependencies, as they are essential for Firebase to function seamlessly within your app.

Screenshot of Firebase Cloud Messaging Menu

Well done, your client side is ready, if you want more information about client side configuration you can get it on the documentation guide for Android or for iOS or other platforms you will find on the side panel of the Cloud Messaging documentation page.

Obtaining Device Tokens

For each app-installation, Firebase is going to create a token that identifies it, so in case of sending a notification to that specific app-installation, you will need that token.

To learn about getting this token, please read 'Access the device registration token' part on the setting up section of the platform you want to configure Firebase to.

Well done, your client side is ready, if you want more information about client side configuration you can get it on the documentation guide for Android or for iOS or other platforms you will find on the side panel of the Cloud Messaging documentation page.

Sending Our First Notification

We can send push notifications without a fully configured backend, using the Firebase console.

To do this, navigate to your Firebase project, select 'Notifications' in the side panel, and click 'Send your first message'. This will take you to this configuration panel:

Screenshot of Firebase Cloud Messaging

Here you'll need to provide the following details:

  • Message text: The main content of your notification.
  • Target: Define the devices you want to reach, selecting from options like "User segment," "Topic," or "Single device." Each target allows you to tailor your message effectively.

Once you've filled in these fields, click 'SEND MESSAGE'.

A pop-up will display, summarizing the key details of your notification. Click 'SEND', and your push notification is on its way!

Screenshot of Firebase-Cloud Messaging Notification

Configuring Your .NET Backend

For this example, we'll use a .NET backend – a console project designed specifically for a .NET Meetup in Uruguay.

To access the Firebase API, you'll need critical information from Firebase, including the API URL (https://fcm.googleapis.com/fcm/send) and a unique server key that authenticates your Firebase project for security purposes.

To obtain the server key:

  1. Access 'Project settings' as depicted in the image.
  2. Select the 'Cloud Messaging' tab.
  3. Find the server key in the 'Project credentials' section.
Screenshot of Firebase Cloud Messaging Project Settings

Time to Code the Backend

In addition to the API URL and server key, you'll require a method with specific parameters to communicate with the Firebase API. For this purpose, create a static class named "PushNotificationLogic.cs" containing the following method:

Push Notifications Logic Code Method

These parameters are:

  • deviceTokens: An array of strings, each string represents a FCM token provided by Firebase on each app-installation. This is going to be the list of app-installations that the notification is going to send.
  • title: It’s the bold section of a notification.
  • body: It represents 'Message text' field of the Firebase SDK, this is the message you want to send to the users.
  • data: These is a dynamic object, it can be whatever you want because this object is going to be used as additional information you want to send to the app, it’s like hidden information. For example an action you want to execute when the user presses on the notification or an id of some product.

For the method, I am going to suppose that all parameters are correct without bad values (you can add all the validations you want). The first thing we have to do is to create an object with all the data we need to send to the API, I created two classes for that:

public class Message
{
public string[] registration_ids { get; set; }
public Notification notification { get; set; }
public object data { get; set; }
}
public class Notification
{
public string title { get; set; }
public string text { get; set; }
}

Then, just create a new object of type 'Message' and serialize it as I did it here:

var messageInformation = new Message()
{
notification = new Notification()
{
title = title,
text = body
},
data = data,
registration_ids = deviceTokens
};
//Object to JSON STRUCTURE => using Newtonsoft.Json;
string jsonMessage = JsonConvert.SerializeObject(messageInformation);

Now we just need a request to Firebase API and we’re done.

The request has to be as a "Post" Method to the Firebase API-Url, we have to add a Header which is "Authorization" and use a value like: “key={YourServerKey}”.

Then we add the content (jsonMessage) and you are ready to hit the api.

Here it is the code you need to do the last part:

// Create request to Firebase API
var request = new HttpRequestMessage(HttpMethod.Post, FireBasePushNotificationsURL);
request.Headers.TryAddWithoutValidation(“Authorization”, “key=” + ServerKey);
request.Content = new StringContent(jsonMessage, Encoding.UTF8, “application/json”);
HttpResponseMessage result;
using (var client = new HttpClient())
{
result = await client.SendAsync(request);
}

Thank You For Reading!

Related Articles

View all articles

·

Sep 21, 2026

When PMs can ship code, what changes for Engineering?

AI coding agents give Product and Engineering more autonomy, plus a new coordination problem. See how a two-cycle model keeps both moving.

12 read time

Read more

AI has changed what Product Managers can do.

A PM can now go from an idea to working software in hours. They can build a flow, put it in front of a customer, learn from it, change it, and test again without waiting for every iteration to go through Engineering.

That creates an opportunity for product teams. It also creates a new challenge.

Just because a PM can build something doesn’t mean that thing is ready to become production software.

If we don’t rethink how Product and Engineering work together, faster prototyping can become more code for Engineering to untangle, more unclear ownership, and more pressure to turn experiments into production features.

The answer is to separate exploration from construction.

PMs and engineers are solving different problems

During product discovery, the PM is trying to answer: Should we build this?

That means testing assumptions, changing direction quickly, throwing things away, and getting something real enough in front of a customer to learn from it.

Engineering is solving a different problem: How do we build this correctly?

That means thinking about architecture, security, maintainability, performance, edge cases, and everything else required for software that has to live in production.

Both need AI. But they don’t need the same working conditions.

Exploration benefits from speed, autonomy, and low friction. Construction needs stronger guarantees and guardrails. Trying to optimize the same environment for both creates tension.

So instead of asking how PMs can safely contribute code to the production codebase, there’s a more useful question: What if PMs had their own space to build and validate ideas?

Give PMs a safe place to explore

A PM working with an AI coding agent can build functional versions of new ideas. Not a Figma screen. Not a ticket describing what something might do.

Working software that can be used to test the product experience. The important part is that this environment is separate from production.

That boundary gives the PM freedom to experiment without requiring the same controls we’d expect from production software. The environment can be designed so experiments can’t affect the live product or access things they shouldn’t.

Now the PM’s workflow can look more like:

Idea → build → test with users → learn → iterate

Engineering doesn’t need to be pulled into every cycle.  Engineering still matters. It  gets brought in once Product has stronger evidence about what’s worth building.

The prototype shouldn’t be the handoff

This is where things can go wrong.

If a PM spends two days building something with AI and then gives the repository to Engineering saying, “It mostly works, can you finish it?”, we haven’t improved the product development process. We may have just moved the mess downstream.

The prototype should help answer product questions. It shouldn’t make technical decisions on Engineering’s behalf.

What Engineering needs from exploration is intent.

  • What does the feature need to do?
  • How should it behave?
  • What did we learn from customers?
  • What happens in the important edge cases?
  • How will we know when the production version works as intended?

That becomes the handoff.

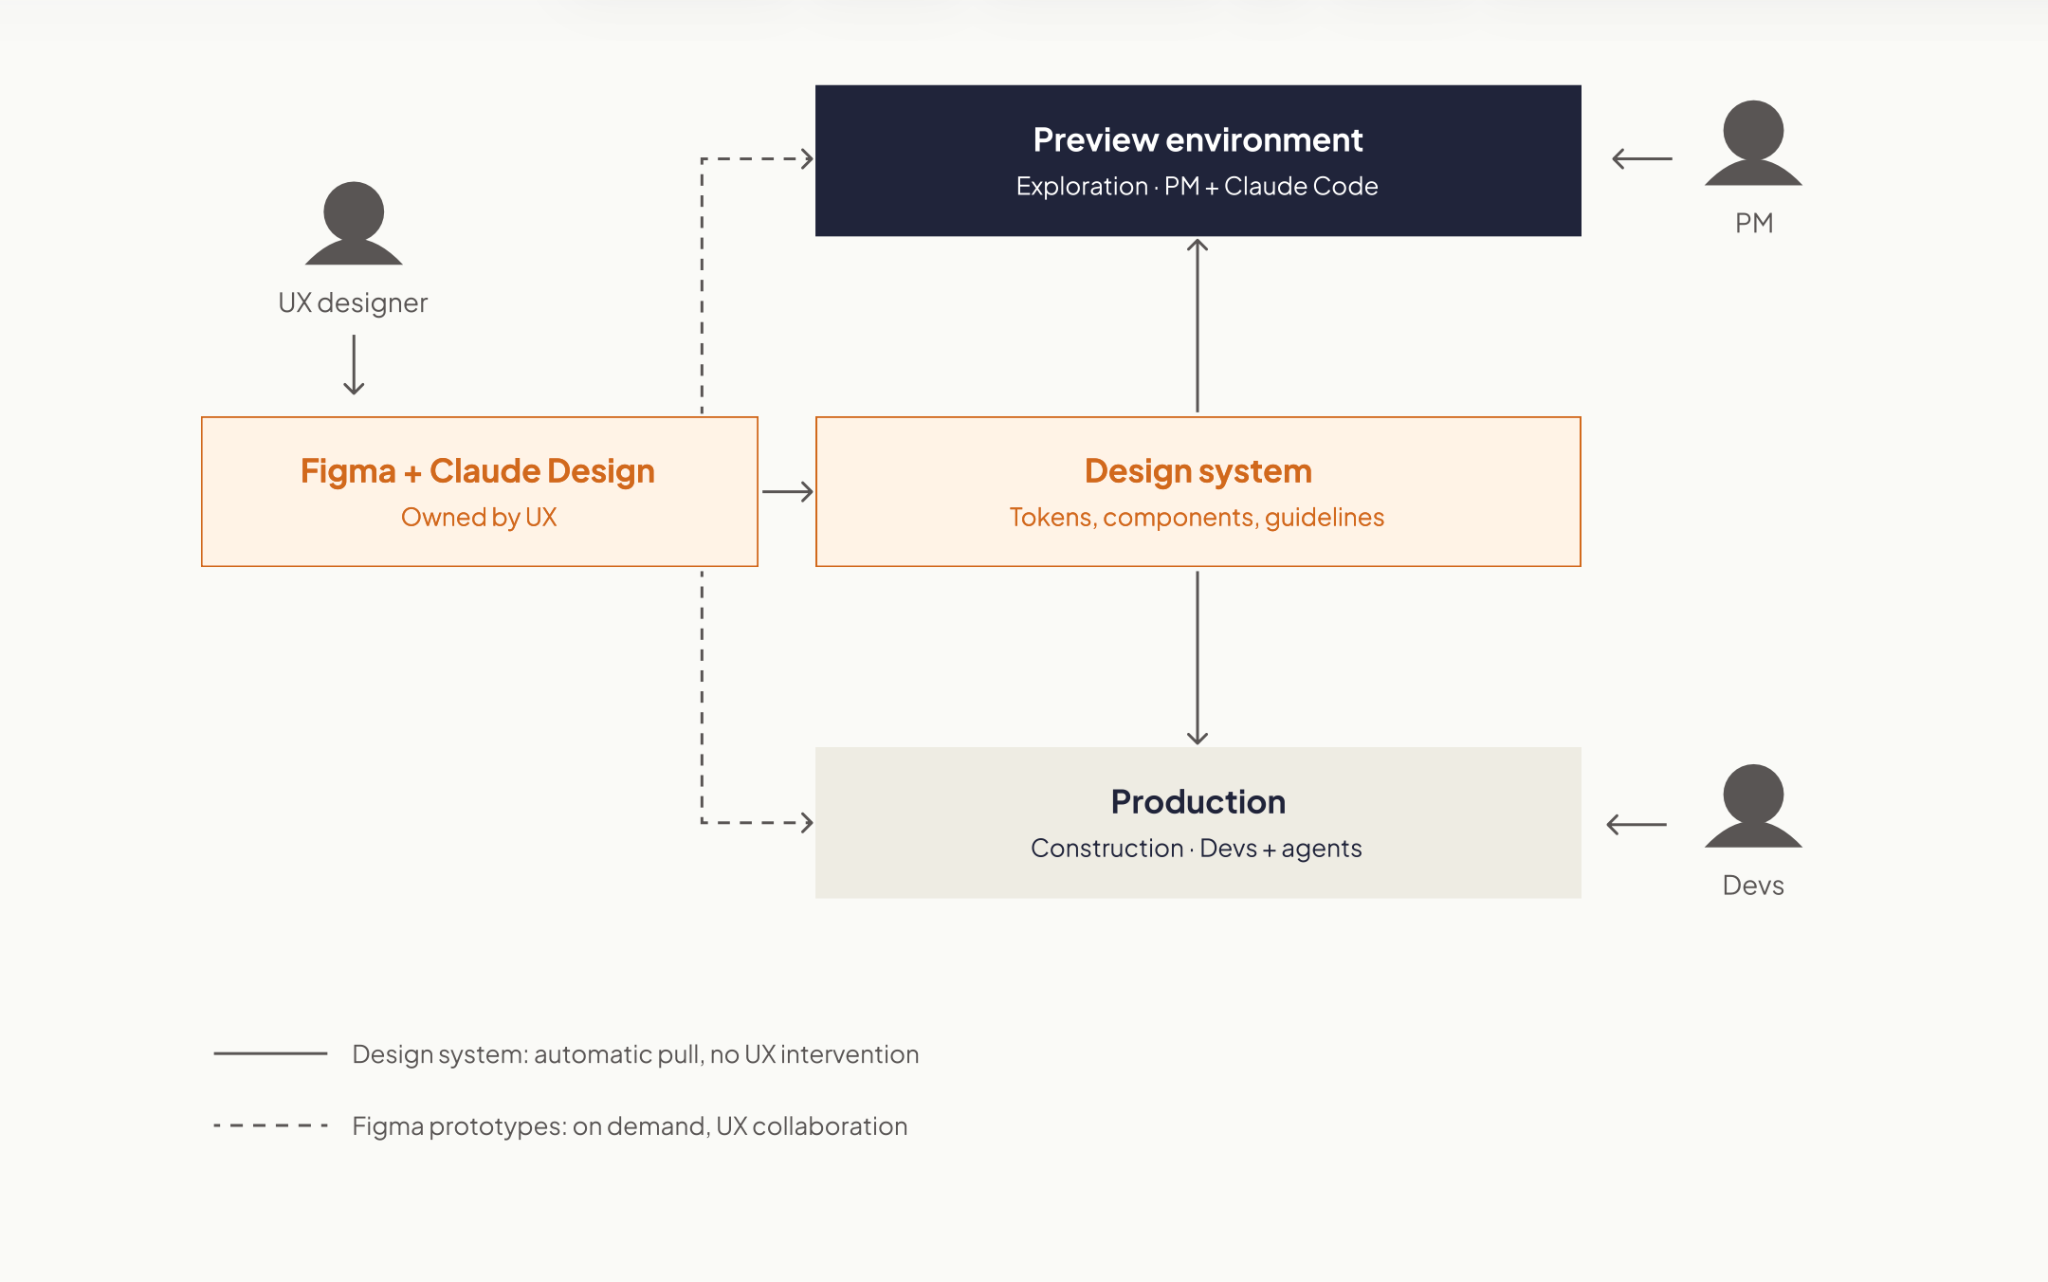
At Kaizen, we’ve been exploring a model where the bridge between the two cycles is a behavioral specification and a test plan, supported by the working prototype as a reference. The implementation itself stays behind.

What crosses into construction is the spec: a behavioral description, a test plan, and a link to the prototype as reference. The prototype itself stays where it was built.

In simple terms:

Product owns the what. Engineering owns the how.

That distinction matters even more now that AI makes it so easy for both sides to generate code.

What the workflow could look like

A PM starts with a product hypothesis. Instead of immediately turning it into a backlog item, they use AI to build enough of the experience to test it. They put it in front of users. They discover that part of the original idea was wrong. So they change it. They test again.

Once the problem and desired behavior are clear enough, the PM closes the exploration cycle with a clear specification and acceptance criteria.

Engineering then starts from that understanding, not from the PM’s experimental code only. They decide how the feature fits into the architecture, how it should be implemented, what needs to be verified, and how it reaches production.

The result is two parallel forms of autonomy:

  • PMs don’t need Engineering for every experiment.
  • Engineers don’t inherit implementation decisions from every experiment.

More autonomy doesn’t have to mean less ownership.
AI can make discovery faster

A lot of the conversation around AI in software teams is still about developer productivity. How much faster can we write code? How much implementation can an agent take on?

Those questions matter. But for Product, there may be an even bigger opportunity upstream. AI can shorten the distance between having an idea and learning whether that idea is any good.

That changes what PMs can bring to an engineering team. Instead of: “We think customers want this.” They can increasingly say: “We tested this behavior with customers. Here’s what worked, what didn’t, and exactly what we now need the product to do.”

That’s a much better starting point for building production software.

If you have a prototype and want to take the idea into production, we can help you determine what needs to happen next.

·

Aug 28, 2026

About Catalyst 26: Partnerships & Ecosystem Conference

Everything to know about Catalyst 26: dates, price, who attends, both keynote recaps, and when the next Catalyst event is.

12 read time

Read more

Catalyst 26 was Partnership Leaders' fifth annual conference for partnership, ecosystem, and go-to-market professionals. It took place August 25 and 26, 2026, at the Marriott Hotel at the Brooklyn Bridge in New York, with more than 1,000 attendees and 70-plus speakers from companies including Anthropic, OpenAI, Google, Microsoft, IBM, BCG, and Siemens.

Dates August 25–26, 2026
Location Marriott Hotel at the Brooklyn Bridge, Brooklyn, NY
Edition 5th annual
Attendees 1,000+ partnership, ecosystem, and GTM professionals
Speakers 70+, including people from Anthropic, OpenAI, Google, Microsoft, IBM, BCG, and Siemens.
Price $849 early bird, rising to $999, then $1,999

Who Catalyst events are for

Catalyst brought together people building and running partner programs across SaaS, AI, consulting, systems integration, agencies, and major cloud platforms.

Attendees included executives leading partnership organizations, and people working directly in alliances, partner sales, marketing, operations, strategy, and enablement.

What Catalyst 26 is like

You can look at the agenda before a conference and have a pretty good idea of what you'll find. Being there is different.

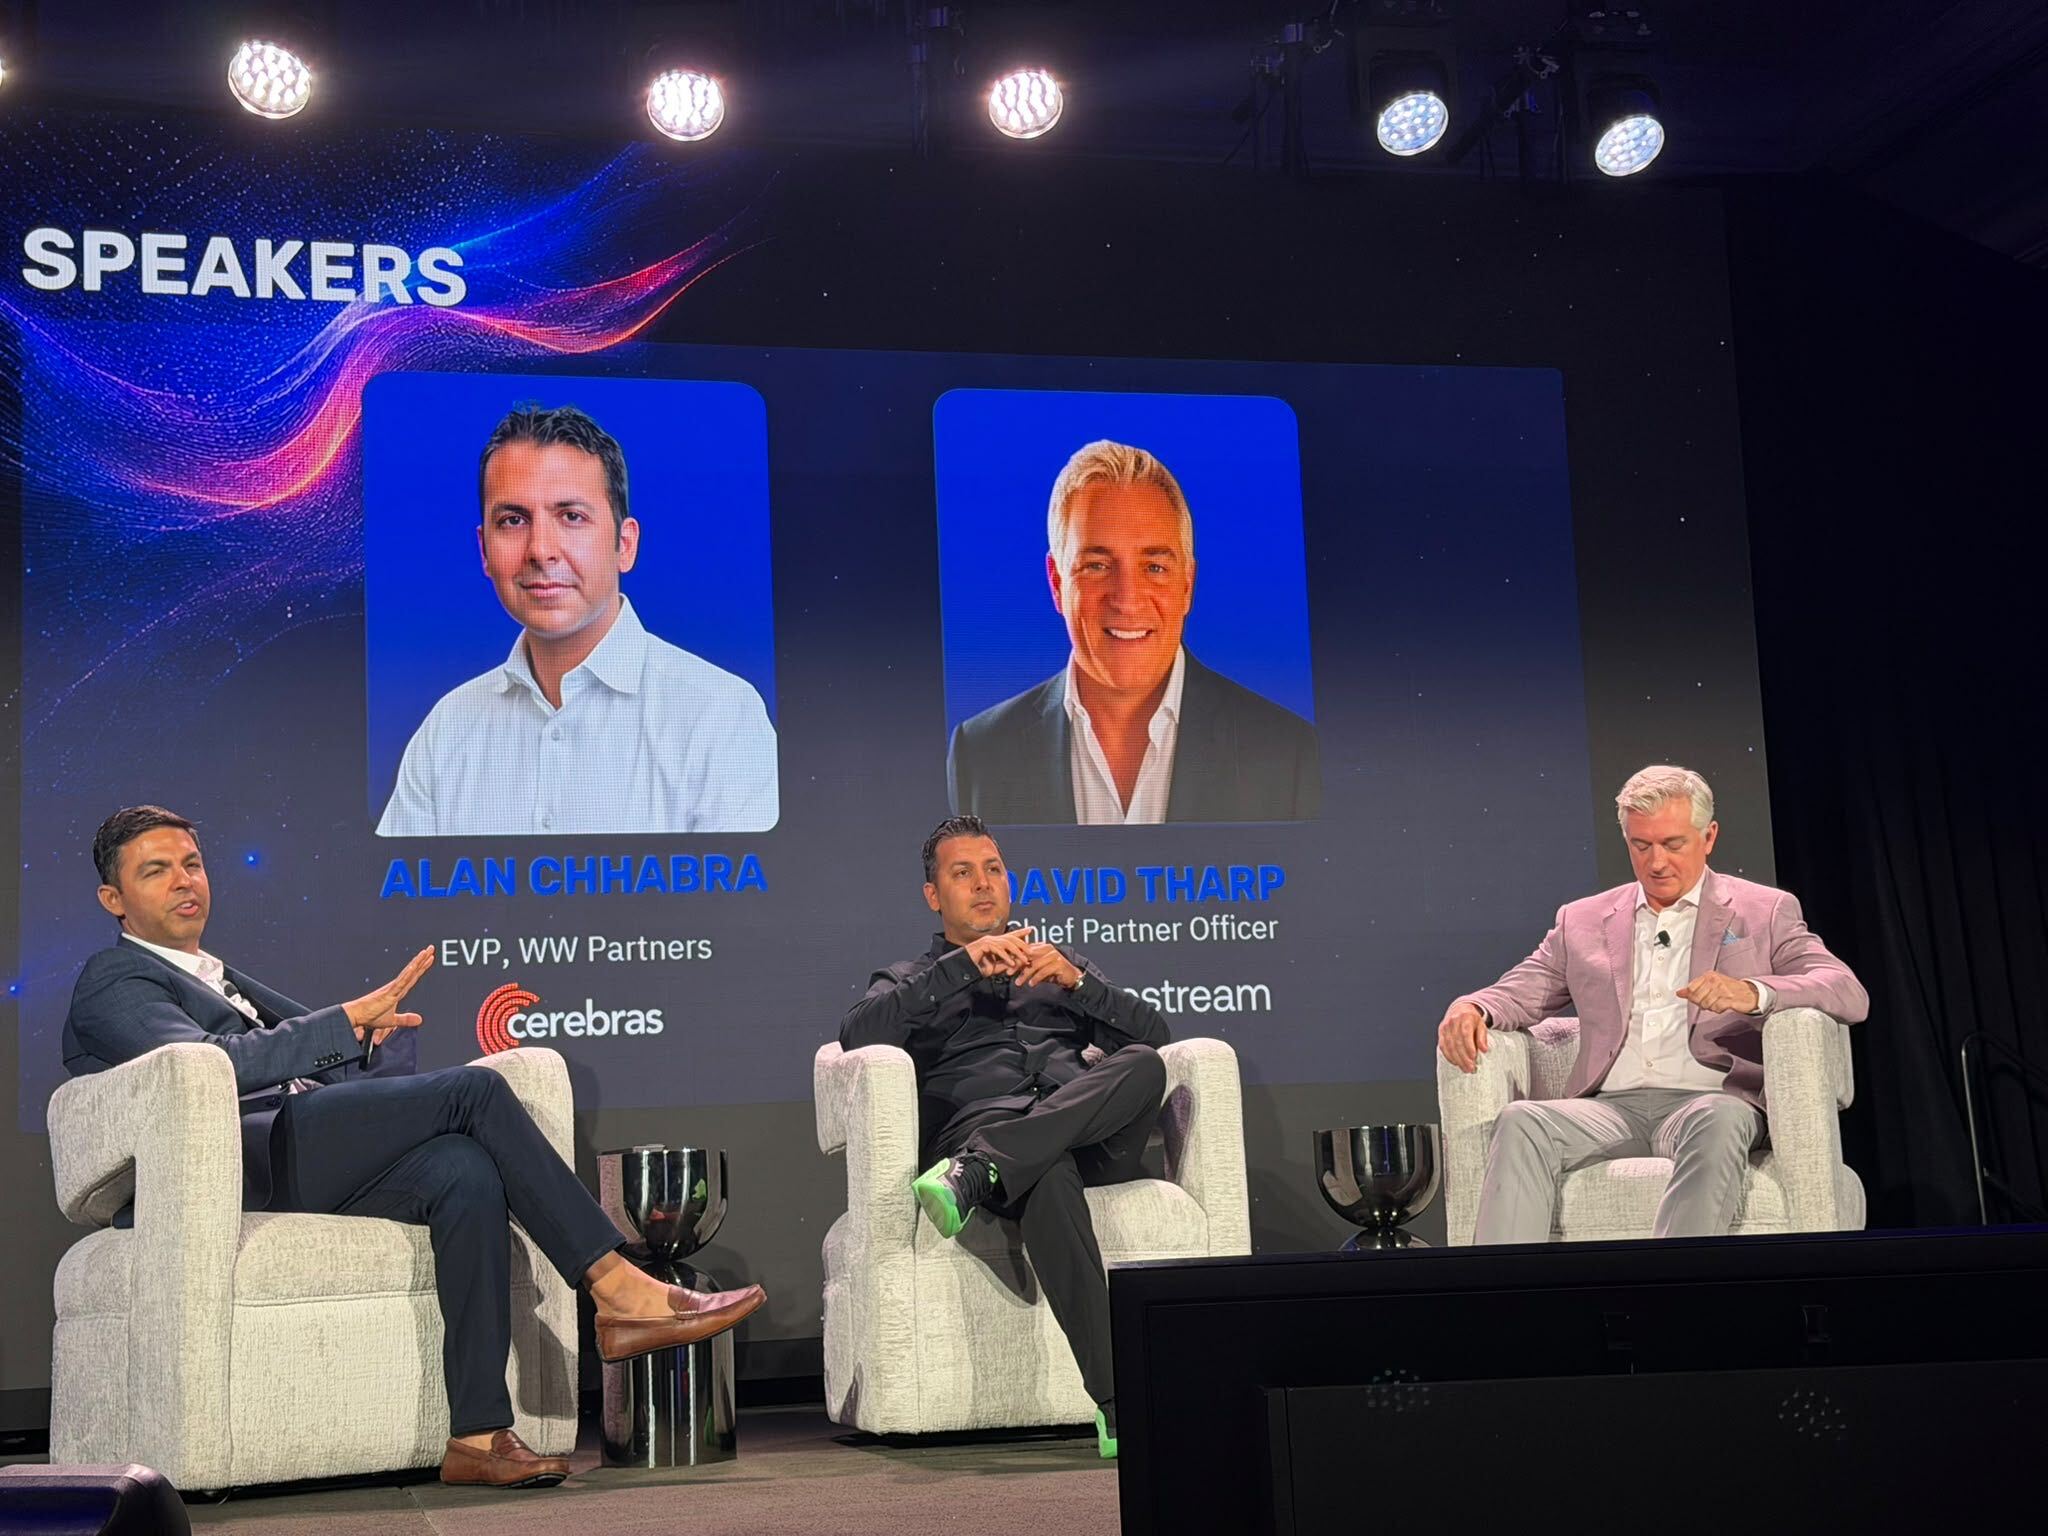
This year's theme was "Navigating Frontier Ecosystems". Anthropic's Head of Partnerships and one of OpenAI's partner program leads appeared on the same agenda as people from Oracle, Siemens, IBM, and BCG, companies that have run formal partner programs for two decades.

That mix was one of the most interesting parts of the conference. Newer AI companies were discussing partner tiers, co-selling, and joint delivery alongside companies where those models have been part of their business for years.

What Catalyst 26 covered

Catalyst 26 split its sessions into eight pillars:

  • Advancing Organizational Maturity: turning partnerships into something measured and repeatable instead of one founder doing favors for another.
  • Become a Strategic Partner: getting partnerships involved when product and business decisions are made, not told about them afterward.
  • Frontier Partner Experience: adapting partner programs as AI changes how companies build and integrate products.
  • Path to CPO: career sessions for people aiming to lead partnerships at the executive level.
  • Co-Build: two companies building something together.
  • Co-Market: two companies running a campaign together.
  • Co-Sell: two sales teams working the same deal.
  • Co-Serve: two companies delivering the same engagement to a client.

Catalyst 26 sessions

Day 1 Keynote

The Day 1 keynote brought together Partnership Leaders’ CEO Asher Mathew, Tribe AI’s Co-founder & CEO Jaclyn Rice Nelson, Anthropic’s Head of Partnerships Phil Samenuk, and Boomi’s Chairman & CEO Steve Lucas.

Their discussion focused on how companies are relying on partners to build, sell, and deliver products across AI, cloud, and enterprise software. A few points stood out:

  • More companies have dedicated partner teams now, which means a generic, one-size-fits-all partner program doesn't cut it anymore. Partners show up when the program fits how they work.
  • New AI products and cloud services are shipping so fast that a partner program can't just get set once and left alone. Incentives, support, and how you work together need regular updates.
  • Partnerships also came up as a way to access data a company couldn’t reach on its own, whether that meant getting access to it, combining it, or putting it to use.
  • AI doesn't change the basics of a good partnership. Account planning, clear ownership, and relationships built over time still matter most.

Day 2 Keynote

The Day 2 keynote featured Ramp’s Lead Economist Ara Kharazian, Eliza’s Founder Brian Benedict, Siemens’ EVP Global Partner Ecosystem Dion Smith, and Oracle’s SVP, Partner Sales & Operations Strategy Leah Yomtovian.

A few points stood out:

  • The spending data told a slower story than expected: AI adoption is mostly going toward productivity gains and task automation, not some overnight shift.
  • Siemens is in the middle of folding more than 68,000 partners and roughly 200 separate programs into a single global one, mainly to make it easier to coordinate across IT and operational technology.
  • Oracle's approach is a running "listening tour": every partner gets the same baseline benefits, then incentives and credits get layered based on the type of partner and how they work with Oracle.
  • There was also talk of a newer kind of service team: bring in engineers, turn AI requirements into working products, and reuse delivery methods that already work instead of starting from scratch each time.

Next Catalyst events

The date and location of Catalyst 27 hasn’t been announced yet. In the meantime, you can check out the half-day Catalyst Summits in different cities:

  • October 20, 2026 - Seattle
  • October 27, 2026 - Chicago
  • October 2026 - Los Angeles
  • December 2026 - Singapore

Check Partnership Leaders’ events page for updates.

llms.txt