Welcome to the first installment of our series dedicated to streamlining web development and boosting your productivity.
If you’ve ever found yourself drowning in repetitive CSS tasks, this post is your lifeline. In this post, we’ll delve into the basics of Sass, paving the way for a more efficient and enjoyable web development journey. Say hello to cleaner, more maintainable code, and wave goodbye to CSS monotony.
Web Development Journey
The scenario is simple, you’re developing a website or web app, and for sure you want it to look as good as you can, which is obviously accomplished by using CSS. Then you find yourself repeating tag names, properties, colors, and having a gigantic main.css file (or maybe a lot of <src rel="stylesheet"> tags in your HTML header?).
And what if you want to change something as the main color of your website? Dozens of lines changed just because #7a19a8 seemed slightly better than #7211a0.

Is there even a difference?
Well, to solve all of this and more, in 2006 the Syntactically awesome style sheets were created, Sass for the friends. Sass is a preprocessor scripting language that is interpreted or compiled into simple CSS. What all of this means is that Sass extends the CSS syntax, using a similar structure, with a lot more fuctionality.
Usage
All installation steps are covered in Sass’ official install guide. In this post, I’m going to show you some basic syntax so you can make your CSS better since day one.
Variables
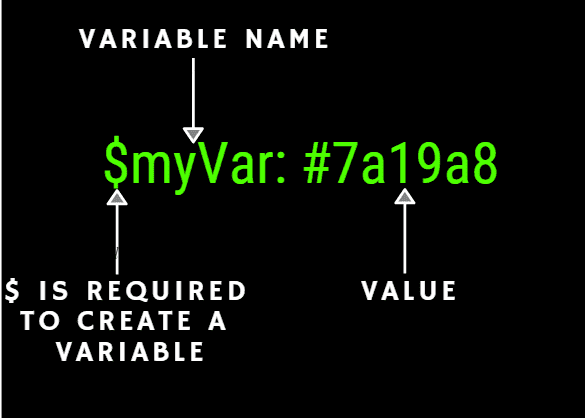
Variables are a core part of Sass, the premise is that you declare any data in the form of a valid data type in Sass, and you can use it all along your stylesheet. Here is the syntax:

Nested Selectors
With Sass Selector nesting we can transform this:
div {
  // Some properties for a div
}
div span {
  // Some properties for a span tag inside a div
}
div p {
  // Some properties for a p tag inside a div
}
Into:
div {
  // Some div properties

    span {
      // Some properties of a span tag inside a div
    }

    p {
      // Some properties of a p tag inside a div
    }
}
Basically, you can nest selectors within selectors to avoid repeating tags each time you may need to go deeper in order to win specificity.
You can also add pseudo elements and modify parent selectors inside themselves with the & symbol, this way:
div {
  // div properties
  &.steve {
    // properties of a div with steve class
  }
}
Mixins
A mixin is a Sass feature that allows you to define reusable pieces of code, and even allows parameters, just as functions, in order to modify its behavior without having to draw upon semantic classes as .margin-box-size-1. Let’s see them:
@mixin box-size($size: 1em) {
    margin: $size;
    padding: $size;
}
You define a mixin by using @mixin, then you name it, in this case is box-size and write down the parameters it will receive, if any. In this case we also have a default parameter $size: 1em. The variables will be replaced with their value at build time, and everything inside the mixin will be placed wherever is used across the stylesheet. You call the mixin function by using @include followed by the mixin name.
div {
    @include box-size(3em);
}

// Will be replaced by

div {
    margin: 3em;
    padding: 3em;
}
Control Directives
With Sass we can bring common programming sentences into stylesheets, with control directives as @if, @for, @each and @while, we can sort out, repeat and take from a map or list any piece of code. Lets take a brief look over each syntax.
@if
The @if directive takes any SassScript truthy or false expression and executes whichever code sections applies:
@if (true) {
    // This code will always run
} @else {
    // this code will never run
}
@for
The @for directive is pretty straight forward, it runs the code inside the braces for a determined amount of times. The syntax is as follows:
// We declare a variable $i for the iterator, which starts at [from] and ends in [trough] values
@for $i from 1 through 6 {
    margin: $i+px;
}
@while
The @while directive works pretty much as the @for directive, with the difference that the condition of the loop to execute is entirely on us, and not only an incremental operator.
$execute: true;

@while ($execute) {
    @debug($execute);
}
Tip
@debug() will print out any value to the console while building, as its name says, its awesome for debugging!
@each
Last but not least, @each works slightly different from the other directives, as it goes trough a collection such a map or a list instead of simply a condition, and exposes the current value for you to use.
$colors: red green blue;

@each $color in $colors {
    background: $color
}
Conclusion
And that’s it! With this easy tool you can start to write cleaner and more maintainable CSS from now on.
If you have any doubts you can find me on twitter as @stiv_ml. I will be more than pleased to answer any question!


