Kaizen Teams

Dropdown

Table of Contents

Time to read

·

12

Published on

·

April 11, 2018

Last updated on

·

April 10, 2026

Eduardo Mereles, Full-Stack Developer at Kaizen Softworks

Eduardo Mereles

Responsibility police

Full-Stack Developer

How to Setup Firebase Push Notifications with a .NET Backend

Published on

·

April 10, 2026

Last updated on

·

April 10, 2026

Time to read

·

12

Eduardo Mereles, Full-Stack Developer at Kaizen Softworks

Eduardo Mereles

Full-Stack Developer

At Kaizen Softworks, we are currently working on a site that uses Angular 2, .NET and Azure as main technologies.

In addition to this project, one of our partners was needing a mobile application that was going to use the same database as the web app. To facilitate communication between the backend and all of their applications, we needed a robust solution for sending notifications with concealed information to the mobile app.

After a thorough proof of concept, we decided to harness the capabilities of Firebase to bridge the gap between our backend and various applications.

What is Firebase?

Firebase serves as a Backend as a Service (BaaS) that simplifies the creation of a backend with minimal coding expertise. It offers seamless integration with various platforms, including iOS, Android, Unity, and C++.

Firebase's extensive range of services spans authentication, storage, real-time database, crash reports, and Firebase Cloud Messaging (FCM), which is instrumental for push notifications.

Advantages of Firebase Cloud Messaging (FCM)

FCM gives us many advantages, here is the list of the most important:

  1. Cost-Effective: FCM offers unlimited use for free, making it a budget-friendly choice.
  2. Multi-Platform Integration: It seamlessly integrates with multiple platforms, simplifying the development process.
  3. Well-Documented: Firebase provides comprehensive documentation, making it user-friendly.
  4. Swift Delivery: FCM ensures that 95% of all notifications experience a minimal delay of just 250ms from the time of dispatch to reception on the recipient's platform (courtesy of Google).
  5. Audience Targeting: You can tailor messages to specific devices, platforms, or user groups.
  6. Versatile Messaging: Messages can be dispatched via the Firebase Console or the Firebase API.

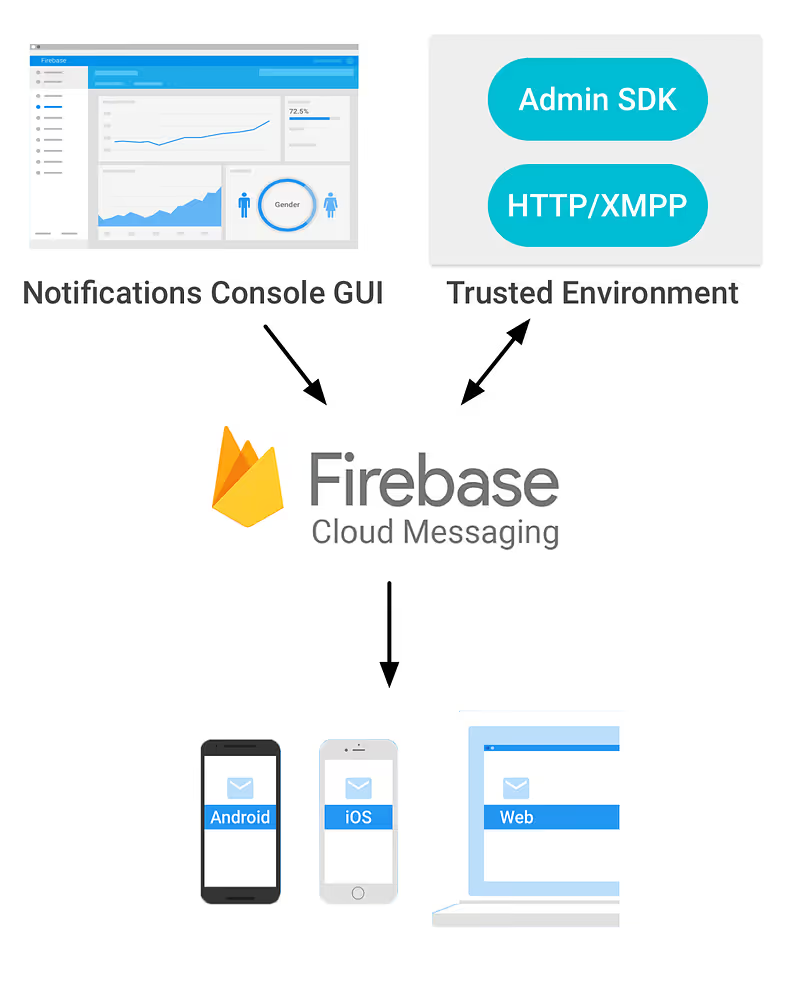
Here's the FCM flow:

Graphic of Firebase Cloud Messaging Flow

Setting up the Client-Side

Now that the Firebase introduction is finished, it’s coding and configuring time.

To begin, create a Firebase Console project using your Google account. Once in the Firebase dashboard, select 'Add project'. Specify your project's name and region, and then click on 'Create project'.

Ok, you’re done! You have your project created, so now you are able to use all Firebase functionalities!

You must register each platform you intend to configure Firebase for. In this tutorial, we'll focus on configuring an Android project.

During app registration, you'll need to fill in the package name according to your app's specifications. Firebase's initial project already contains the package name, typically set as 'com.google.firebase.quickstart.fcm'. You can find these projects in the documentation samples section.

Following app registration, you'll need to download and add the 'google-services.json' file to your project. If you haven't already received it from Firebase, they will provide it.

Additionally, don't forget to add FCM dependencies, as they are essential for Firebase to function seamlessly within your app.

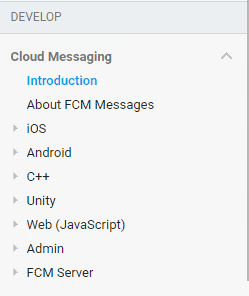
Screenshot of Firebase Cloud Messaging Menu

Well done, your client side is ready, if you want more information about client side configuration you can get it on the documentation guide for Android or for iOS or other platforms you will find on the side panel of the Cloud Messaging documentation page.

Obtaining Device Tokens

For each app-installation, Firebase is going to create a token that identifies it, so in case of sending a notification to that specific app-installation, you will need that token.

To learn about getting this token, please read 'Access the device registration token' part on the setting up section of the platform you want to configure Firebase to.

Well done, your client side is ready, if you want more information about client side configuration you can get it on the documentation guide for Android or for iOS or other platforms you will find on the side panel of the Cloud Messaging documentation page.

Sending Our First Notification

We can send push notifications without a fully configured backend, using the Firebase console.

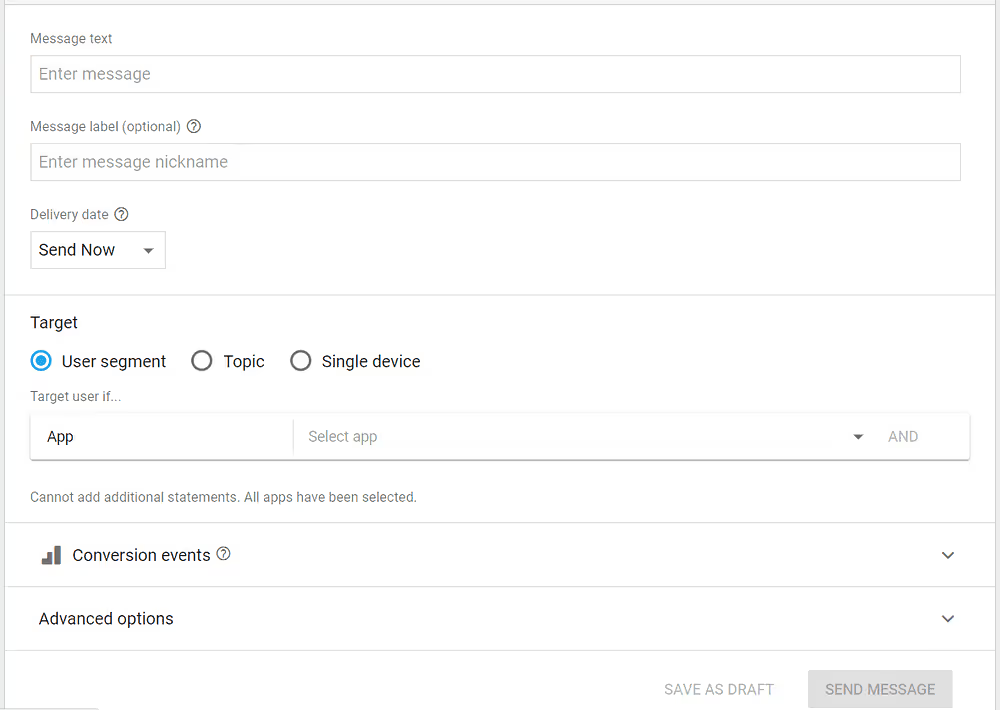
To do this, navigate to your Firebase project, select 'Notifications' in the side panel, and click 'Send your first message'. This will take you to this configuration panel:

Screenshot of Firebase Cloud Messaging

Here you'll need to provide the following details:

  • Message text: The main content of your notification.
  • Target: Define the devices you want to reach, selecting from options like "User segment," "Topic," or "Single device." Each target allows you to tailor your message effectively.

Once you've filled in these fields, click 'SEND MESSAGE'.

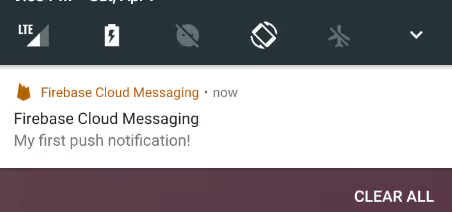
A pop-up will display, summarizing the key details of your notification. Click 'SEND', and your push notification is on its way!

Screenshot of Firebase-Cloud Messaging Notification

Configuring Your .NET Backend

For this example, we'll use a .NET backend – a console project designed specifically for a .NET Meetup in Uruguay.

To access the Firebase API, you'll need critical information from Firebase, including the API URL (https://fcm.googleapis.com/fcm/send) and a unique server key that authenticates your Firebase project for security purposes.

To obtain the server key:

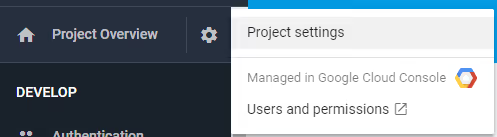
  1. Access 'Project settings' as depicted in the image.
  2. Select the 'Cloud Messaging' tab.
  3. Find the server key in the 'Project credentials' section.
Screenshot of Firebase Cloud Messaging Project Settings

Time to Code the Backend

In addition to the API URL and server key, you'll require a method with specific parameters to communicate with the Firebase API. For this purpose, create a static class named "PushNotificationLogic.cs" containing the following method:

Push Notifications Logic Code Method

These parameters are:

  • deviceTokens: An array of strings, each string represents a FCM token provided by Firebase on each app-installation. This is going to be the list of app-installations that the notification is going to send.
  • title: It’s the bold section of a notification.
  • body: It represents 'Message text' field of the Firebase SDK, this is the message you want to send to the users.
  • data: These is a dynamic object, it can be whatever you want because this object is going to be used as additional information you want to send to the app, it’s like hidden information. For example an action you want to execute when the user presses on the notification or an id of some product.

For the method, I am going to suppose that all parameters are correct without bad values (you can add all the validations you want). The first thing we have to do is to create an object with all the data we need to send to the API, I created two classes for that:

public class Message
{
public string[] registration_ids { get; set; }
public Notification notification { get; set; }
public object data { get; set; }
}
public class Notification
{
public string title { get; set; }
public string text { get; set; }
}

Then, just create a new object of type 'Message' and serialize it as I did it here:

var messageInformation = new Message()
{
notification = new Notification()
{
title = title,
text = body
},
data = data,
registration_ids = deviceTokens
};
//Object to JSON STRUCTURE => using Newtonsoft.Json;
string jsonMessage = JsonConvert.SerializeObject(messageInformation);

Now we just need a request to Firebase API and we’re done.

The request has to be as a "Post" Method to the Firebase API-Url, we have to add a Header which is "Authorization" and use a value like: “key={YourServerKey}”.

Then we add the content (jsonMessage) and you are ready to hit the api.

Here it is the code you need to do the last part:

// Create request to Firebase API
var request = new HttpRequestMessage(HttpMethod.Post, FireBasePushNotificationsURL);
request.Headers.TryAddWithoutValidation(“Authorization”, “key=” + ServerKey);
request.Content = new StringContent(jsonMessage, Encoding.UTF8, “application/json”);
HttpResponseMessage result;
using (var client = new HttpClient())
{
result = await client.SendAsync(request);
}

Thank You For Reading!

At Kaizen Softworks, we are currently working on a site that uses Angular 2, .NET and Azure as main technologies.

In addition to this project, one of our partners was needing a mobile application that was going to use the same database as the web app. To facilitate communication between the backend and all of their applications, we needed a robust solution for sending notifications with concealed information to the mobile app.

After a thorough proof of concept, we decided to harness the capabilities of Firebase to bridge the gap between our backend and various applications.

What is Firebase?

Firebase serves as a Backend as a Service (BaaS) that simplifies the creation of a backend with minimal coding expertise. It offers seamless integration with various platforms, including iOS, Android, Unity, and C++.

Firebase's extensive range of services spans authentication, storage, real-time database, crash reports, and Firebase Cloud Messaging (FCM), which is instrumental for push notifications.

Advantages of Firebase Cloud Messaging (FCM)

FCM gives us many advantages, here is the list of the most important:

  1. Cost-Effective: FCM offers unlimited use for free, making it a budget-friendly choice.
  2. Multi-Platform Integration: It seamlessly integrates with multiple platforms, simplifying the development process.
  3. Well-Documented: Firebase provides comprehensive documentation, making it user-friendly.
  4. Swift Delivery: FCM ensures that 95% of all notifications experience a minimal delay of just 250ms from the time of dispatch to reception on the recipient's platform (courtesy of Google).
  5. Audience Targeting: You can tailor messages to specific devices, platforms, or user groups.
  6. Versatile Messaging: Messages can be dispatched via the Firebase Console or the Firebase API.

Here's the FCM flow:

Graphic of Firebase Cloud Messaging Flow

Setting up the Client-Side

Now that the Firebase introduction is finished, it’s coding and configuring time.

To begin, create a Firebase Console project using your Google account. Once in the Firebase dashboard, select 'Add project'. Specify your project's name and region, and then click on 'Create project'.

Ok, you’re done! You have your project created, so now you are able to use all Firebase functionalities!

You must register each platform you intend to configure Firebase for. In this tutorial, we'll focus on configuring an Android project.

During app registration, you'll need to fill in the package name according to your app's specifications. Firebase's initial project already contains the package name, typically set as 'com.google.firebase.quickstart.fcm'. You can find these projects in the documentation samples section.

Following app registration, you'll need to download and add the 'google-services.json' file to your project. If you haven't already received it from Firebase, they will provide it.

Additionally, don't forget to add FCM dependencies, as they are essential for Firebase to function seamlessly within your app.

Screenshot of Firebase Cloud Messaging Menu

Well done, your client side is ready, if you want more information about client side configuration you can get it on the documentation guide for Android or for iOS or other platforms you will find on the side panel of the Cloud Messaging documentation page.

Obtaining Device Tokens

For each app-installation, Firebase is going to create a token that identifies it, so in case of sending a notification to that specific app-installation, you will need that token.

To learn about getting this token, please read 'Access the device registration token' part on the setting up section of the platform you want to configure Firebase to.

Well done, your client side is ready, if you want more information about client side configuration you can get it on the documentation guide for Android or for iOS or other platforms you will find on the side panel of the Cloud Messaging documentation page.

Sending Our First Notification

We can send push notifications without a fully configured backend, using the Firebase console.

To do this, navigate to your Firebase project, select 'Notifications' in the side panel, and click 'Send your first message'. This will take you to this configuration panel:

Screenshot of Firebase Cloud Messaging

Here you'll need to provide the following details:

  • Message text: The main content of your notification.
  • Target: Define the devices you want to reach, selecting from options like "User segment," "Topic," or "Single device." Each target allows you to tailor your message effectively.

Once you've filled in these fields, click 'SEND MESSAGE'.

A pop-up will display, summarizing the key details of your notification. Click 'SEND', and your push notification is on its way!

Screenshot of Firebase-Cloud Messaging Notification

Configuring Your .NET Backend

For this example, we'll use a .NET backend – a console project designed specifically for a .NET Meetup in Uruguay.

To access the Firebase API, you'll need critical information from Firebase, including the API URL (https://fcm.googleapis.com/fcm/send) and a unique server key that authenticates your Firebase project for security purposes.

To obtain the server key:

  1. Access 'Project settings' as depicted in the image.
  2. Select the 'Cloud Messaging' tab.
  3. Find the server key in the 'Project credentials' section.
Screenshot of Firebase Cloud Messaging Project Settings

Time to Code the Backend

In addition to the API URL and server key, you'll require a method with specific parameters to communicate with the Firebase API. For this purpose, create a static class named "PushNotificationLogic.cs" containing the following method:

Push Notifications Logic Code Method

These parameters are:

  • deviceTokens: An array of strings, each string represents a FCM token provided by Firebase on each app-installation. This is going to be the list of app-installations that the notification is going to send.
  • title: It’s the bold section of a notification.
  • body: It represents 'Message text' field of the Firebase SDK, this is the message you want to send to the users.
  • data: These is a dynamic object, it can be whatever you want because this object is going to be used as additional information you want to send to the app, it’s like hidden information. For example an action you want to execute when the user presses on the notification or an id of some product.

For the method, I am going to suppose that all parameters are correct without bad values (you can add all the validations you want). The first thing we have to do is to create an object with all the data we need to send to the API, I created two classes for that:

public class Message
{
public string[] registration_ids { get; set; }
public Notification notification { get; set; }
public object data { get; set; }
}
public class Notification
{
public string title { get; set; }
public string text { get; set; }
}

Then, just create a new object of type 'Message' and serialize it as I did it here:

var messageInformation = new Message()
{
notification = new Notification()
{
title = title,
text = body
},
data = data,
registration_ids = deviceTokens
};
//Object to JSON STRUCTURE => using Newtonsoft.Json;
string jsonMessage = JsonConvert.SerializeObject(messageInformation);

Now we just need a request to Firebase API and we’re done.

The request has to be as a "Post" Method to the Firebase API-Url, we have to add a Header which is "Authorization" and use a value like: “key={YourServerKey}”.

Then we add the content (jsonMessage) and you are ready to hit the api.

Here it is the code you need to do the last part:

// Create request to Firebase API
var request = new HttpRequestMessage(HttpMethod.Post, FireBasePushNotificationsURL);
request.Headers.TryAddWithoutValidation(“Authorization”, “key=” + ServerKey);
request.Content = new StringContent(jsonMessage, Encoding.UTF8, “application/json”);
HttpResponseMessage result;
using (var client = new HttpClient())
{
result = await client.SendAsync(request);
}

Thank You For Reading!

Related Articles

·

May 15, 2026

Can AI Safely Apply Changes Across Microservices?

Learn how AI can apply changes across microservices when service ownership, message contracts, DTOs, and architectural context are clearly defined.

12 read time

Read more

Applying changes across microservices is difficult because business logic is distributed across multiple services, each with its own data, contracts, and responsibilities.

In our experiment at Kaizen Softworks, we tested whether an AI system could safely apply coordinated changes across a microservices architecture using only minimal input.

Short answer: Yes, but only when the AI has enough architectural context.

Why are coordinated changes in microservices so hard?

In distributed systems, a single business change rarely affects just one service.

It often requires:

  • Updating multiple microservices
  • Modifying message contracts
  • Keeping DTOs (Data Transfer Objects) consistent
  • Respecting domain boundaries defined by Domain-Driven Design (DDD)

Key entities in this system:

  • Microservice: An independently deployable service responsible for a specific domain
  • Aggregate (DDD): A cluster of domain objects treated as a single unit
  • DTO (Data Transfer Object): A structured format used to transfer data between services
  • Message/Event: A communication mechanism between services

The complexity is not in the code, it’s in the relationships between components.

The experiment: Can AI reason across services with minimal input?

We designed a controlled experiment to test whether an AI model could apply system-wide changes with limited information.

Input given to the AI:

  • Message definitions (events between services)
  • DTOs (data contracts)

Tasks the AI had to perform:

  1. Identify affected aggregates
  2. Determine service ownership
  3. Apply coordinated changes across services
  4. Maintain consistency in messages and DTOs

In other words, the AI had to behave like a software architect, not just a code generator.

What was the biggest obstacle?

The biggest challenge was not technical, it was contextual.

Before and after diagram showing how ambiguous microservice names prevent AI from understanding service ownership, while aggregate-to-service mapping helps AI apply safe coordinated changes.

Problem: unclear service naming

Instead of descriptive names like:

  • order-service
  • billing-service

Our services were named:

  • john
  • sally
  • roger

This removed any semantic clues about responsibility.

Result: The AI could not infer which service owned which domain logic.

The missing piece: aggregate ownership mapping

To solve this, we introduced a simple but powerful structure:

Aggregate → Service mapping

  • Order → john
  • Shipment → sally
  • Invoice → roger

This created a clear relationship between domain concepts and system components.

Once ownership was explicit, the architecture became understandable.

How we used AI to generate architectural context

Instead of building this mapping manually, we used AI to analyze the codebase and extract:

  • Where each aggregate was defined
  • Which microservice implemented it
  • The relationship between domain and infrastructure

The result was a machine-readable architecture map.

In practice, we used AI to generate the context that AI itself needed.

Results: Can AI safely apply distributed changes?

With the architecture map in place, the AI was able to:

  • Trace message flows across services
  • Identify affected aggregates
  • Locate the correct microservices
  • Apply coordinated updates
  • Maintain consistency between DTOs and messages

While not perfect, the system worked reliably as a proof of concept.

What is the real limitation of AI in microservices?

The main limitation of AI is not code generation, it’s architectural understanding.

Without knowing:

  • Which components exist
  • How they relate
  • Who owns what

AI cannot safely modify a distributed system.

AI performance depends more on context quality than model capability.

When can AI safely modify microservices?

AI works well when:

  • Aggregate ownership is clearly defined
  • Message contracts are explicit
  • Architecture is structured and consistent

AI struggles when:

  • Naming is ambiguous
  • Relationships are implicit
  • Context is incomplete

Simple rule: If the architecture is clear, AI can reason. If not, it guesses.

Final thoughts

This experiment revealed something important:

AI doesn’t fail because it can’t write code.
It fails because it can’t see the system.

As teams move toward AI-assisted development, the focus will likely shift from:

Writing better code to Designing better systems for machines to understand

At Kaizen Softworks, we see this as a foundational shift.

Because when AI can understand architecture, it doesn’t just generate code, it helps evolve systems.

·

Mar 13, 2026

How We Make Decisions Without Managers

We don’t have traditional managers. This is how we make decisions and keep things moving.

12 read time

Read more

There's a myth that in flat organizations, everyone decides on everything.

That's not how it works. At least not at Kaizen.

When people hear "no managers," they often picture one of two extremes: either total chaos where nobody is accountable, or endless meetings where 80 people vote on which coffee to buy. The reality is neither.

Not everyone decides on everything. Not everyone votes. What we do have is a clear set of decision-making methods that we choose based on context.

It depends on who's affected and how deep the impact goes

Before choosing how to decide, we ask ourselves a few questions:

  • Who is affected? A decision that only impacts one team doesn't need the whole company involved. A decision that affects everyone's daily work does.
  • How deep is the impact? Changing the office furniture is wide but shallow. Changing the salary model is deep and lasting.
  • Is it reversible? If we can easily undo it, we can move fast and just inform. If it's hard to reverse, we slow down and include more people.
  • How urgent is it? And here we're careful to distinguish real urgency from anxiety, the pressure to decide quickly because someone already has "the answer" in mind.

These dimensions help us pick the right method. Not every decision deserves the same process.

Our decision-making toolkit

Over the years, we've landed on a few methods that we use depending on the situation:

1. Role-based decisions

Some decisions belong to a specific role. If someone owns a responsibility, say, office logistics or hiring for a team,  they decide within that domain. No committee needed. The key is that roles are transparent: everyone knows who owns what, and the scope of each role's authority is clear.

2. Advice Process

When a decision doesn't clearly belong to one role, or when it crosses boundaries, we use the advice process. Here's how it works:

  1. Someone takes the initiative. They identify the problem and own the process.
  2. They gather input from people who are affected and people with expertise.
  3. They seek advice, real conversations, not rubber-stamping.
  4. They make the decision and communicate it, including what advice they incorporated and what they didn't (and why).

The decision-maker is not a committee. It's one person (or a small group) who takes responsibility. But they don't decide in isolation, they bring in the perspectives that matter.

We sometimes call this "Team Advice" when a working group forms around an issue that doesn't naturally fall into anyone's area, and "Area Advice" when a team opens up a topic that exceeds their own scope.

3. Consent (not consensus)

Consent is not "everyone agrees." Consent means "no one has a strong enough objection to block this." We do use a poll, but not to count votes — we use a 1-to-5 scale to measure the level of agreement and surface objections, not to let the majority rule.

We use it in two flavors:

  • High-participation consent: For decisions with deep, company-wide impact. This is our most expensive and slowest method, which is exactly why we reserve it for high-impact decisions that affect many people. The Board sets the boundaries, for example, when we moved offices, they defined the monthly budget. Then a working group produced proposals, collected feedback, evolved them, and the whole company expressed their position for the final decision. Silence is not approval; we explicitly ask people to weigh in, even if it's just "I have no objection."
  • Lightweight consent: For decisions that are broad but not deep. Participation is optional, anyone who's interested can jump in. We share the proposal, open a window for objections, and if nobody opposes, we move forward. This gives us speed without sacrificing transparency. If nobody engages, that's a signal too, maybe the proposal doesn't add enough value, or we're using the wrong channel.

4. Inform, don't fake-consult

Not everything needs participation. When a decision has already been made through a legitimate process, the right move is to inform, not to fake-consult. One of the fastest ways to kill self-management is to ask for feedback and then ignore it. If you're not going to change course based on input, don't ask for it, just be transparent about the decision and the reasons behind it.

What we explicitly avoid

  • Decision by Voting. In a company context, majority rule creates losers. And losers become detractors, often generating more resistance than an autocratic decision would have. Instead of voting, we prefer to evolve a proposal through feedback until it's "good enough for now," and then introduce a review point to adjust later. If voting happens at all, it's the cherry on top, not the main course.
  • The "surprise" approach. Working behind closed doors and then unveiling a finished decision is a recipe for frustration. Adults don't need surprises. Adults need to feel like they're part of the process. The complaints that follow a surprise aren't about the decision itself, they're about not being included.

Why we work this way

We didn't adopt these methods because they're trendy. We adopted them because they solve real problems:

  • Better decisions. When you include affected people, you get information you wouldn't have had otherwise. Ideas emerge that no single person would have come up with alone.
  • Less resistance. A person who feels heard is far less likely to resist a decision, even one they wouldn't have made themselves.
  • Faster execution. It sounds counterintuitive, but participative decisions often execute faster because people already understand and support them. The time you "save" by deciding alone, you spend later managing pushback.
  • Distributed authority. When people can make decisions within their domain without escalating everything to a founder, the organization scales. The bottleneck disappears.
  • Resilience. If a shared decision fails, the group adjusts together. If a top-down decision fails, the blame falls on one person and the chances of proactive correction drop.

The real principle behind all of this

Transparency is the foundation. Every method we use, from role-based decisions to high-participation consent, works because information flows openly. People know what's being decided, who's deciding it, and how they can participate.

Horizontal doesn't mean structureless. It means fewer hierarchical levels, clearer roles, and intentional decision-making processes that match the weight of each decision.

Not everyone decides on everything. But everyone knows how things get decided.